How to Use the Tebra Patient Portal for Easy Access to Your Health Records and Payments

The Tebra Patient Portal is a user-friendly platform allowing patients to access and view their health records online. Through the Tebra Patient Portal, patients can review their medical problems, allergies, medications, eLab results, vitals, and shared treatment plans. Additionally, they have the convenience of making online payments, securely messaging their healthcare providers, and authorizing guest access to their account for family members or caregivers.
How to Activate and Navigate the Tebra Patient Portal
Below is a detailed guide that walks you through the activation process and navigation of the Tebra Patient Portal dashboard. This comprehensive overview includes step-by-step instructions on how patients can create their accounts, log in from any device, and efficiently access key features such as health records, documents, messages, payments, and more. Whether you are new to the portal or transitioning from Kareo, this table will help you understand how to make the most of the patient experience with Tebra.
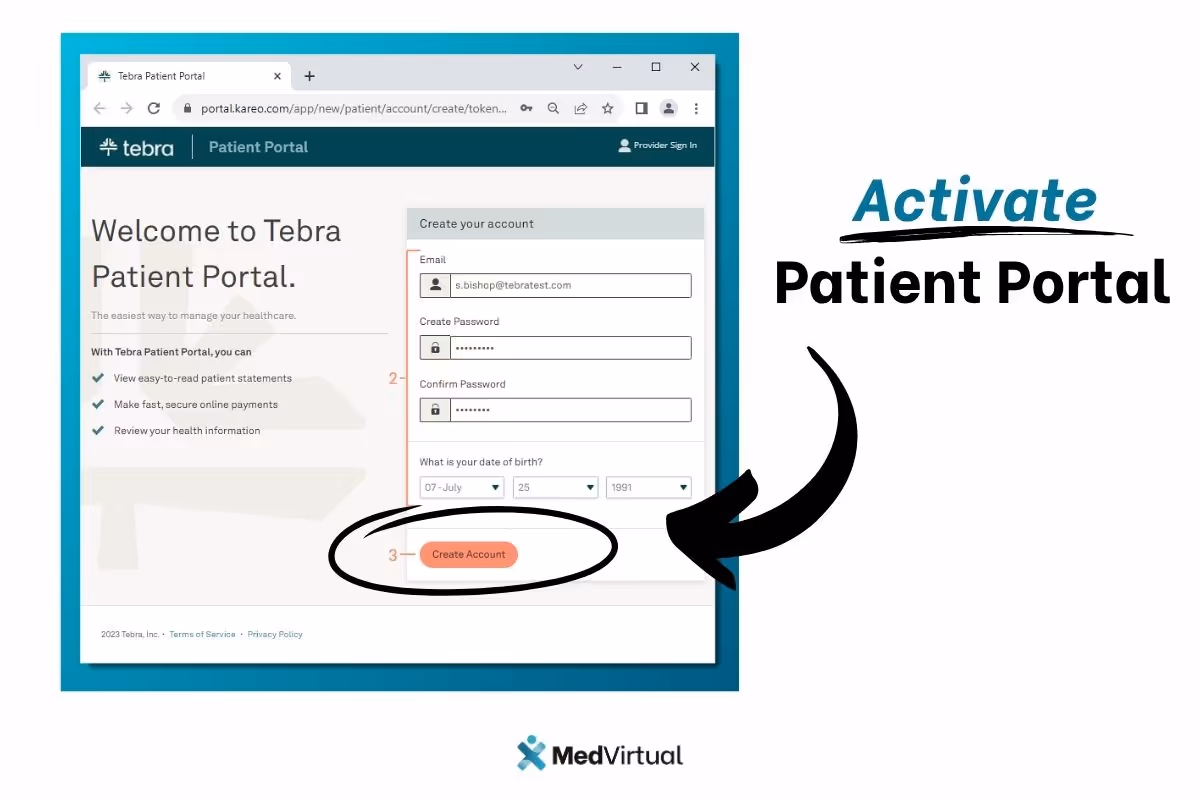
Activate Patient Portal
After the practice invites the patient to the Patient Portal, the patient receives an email invitation to activate their account.
- In the email invitation, the patient clicks Get Started. The create account page opens.
- The patient creates a Password and enters their Date of Birth
Note: The Email auto-populates from the email invitation. - Patient clicks Create Account. The account is created and the Patient Portal dashboard opens.
After the account is activated, patients can log into the anytime through their mobile device or computer.
- The patient opens portal.kareo.com in a web browser. The
- Patient enters their and Password.
- Patient clicks Sign in. The Dashboard opens.

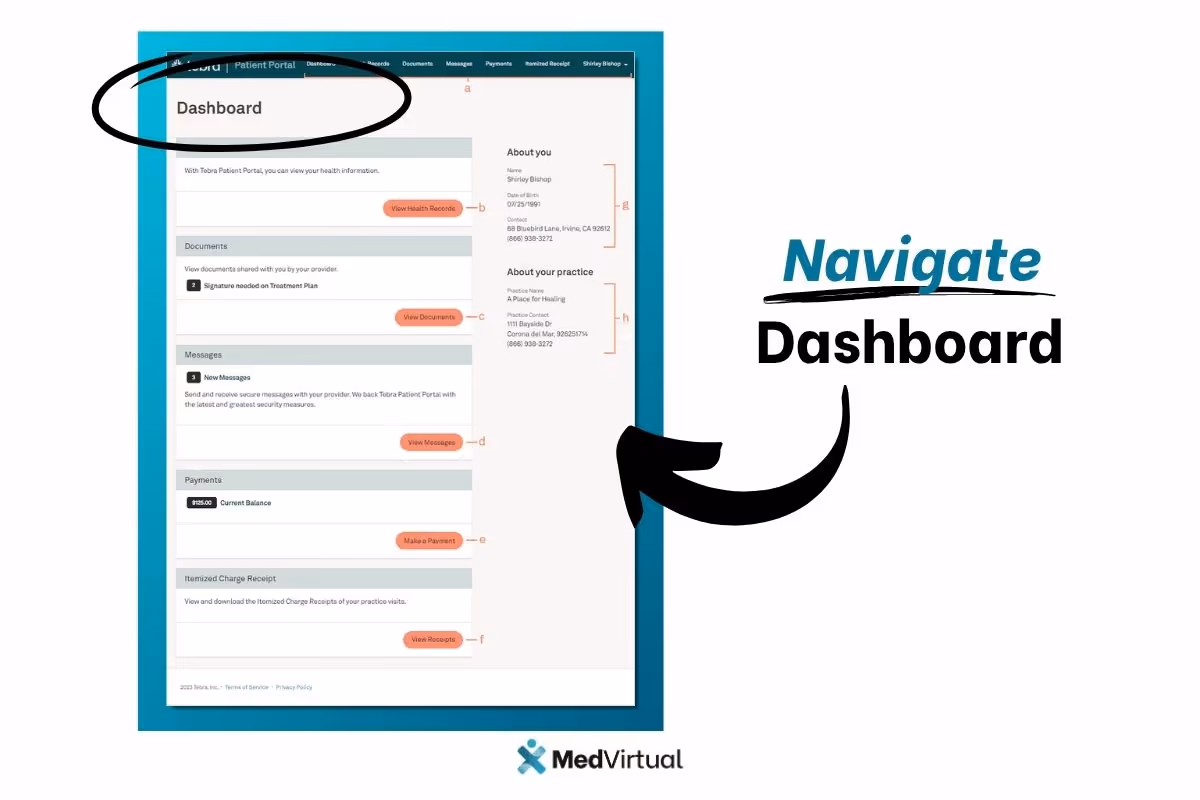
Navigate Dashboard
After the patient logs in, they can access their health information, documents, and more from the Dashboard.
- Top Menu: Click to access the Dashboard, Health Records, Documents, Messages, Payments, or Itemized Receipt. Click on the Patient Name to access My Account or to log out.
- Health Records: Click View Health Records to review health information such as: eLab results, vitals, medications, problems, and allergies.
- Documents: Click View Documents to review shared documents such as treatment plans, patient education, or uploaded documents. A notification displays when a treatment plan signature is requested by the provider.
- Messages: Click View Messages to send and receive messages secure with the provider. A notification displays when a new message is received.
- Payments: If applicable, click to make an online payment, view the bill, or view previous portal payments. Note: Practices must be Tebra Payments or Patient Collect (Stripe) activated for patients to access the payments section.
- Itemized Charge Receipt: If applicable, click to view and download itemized receipts for their visits. Practice must enable the Receipt on Patient Portal setting, for patients to access this section.
- About you: Patient details on file with the practice.
- About your practice: The practice address and contact information.
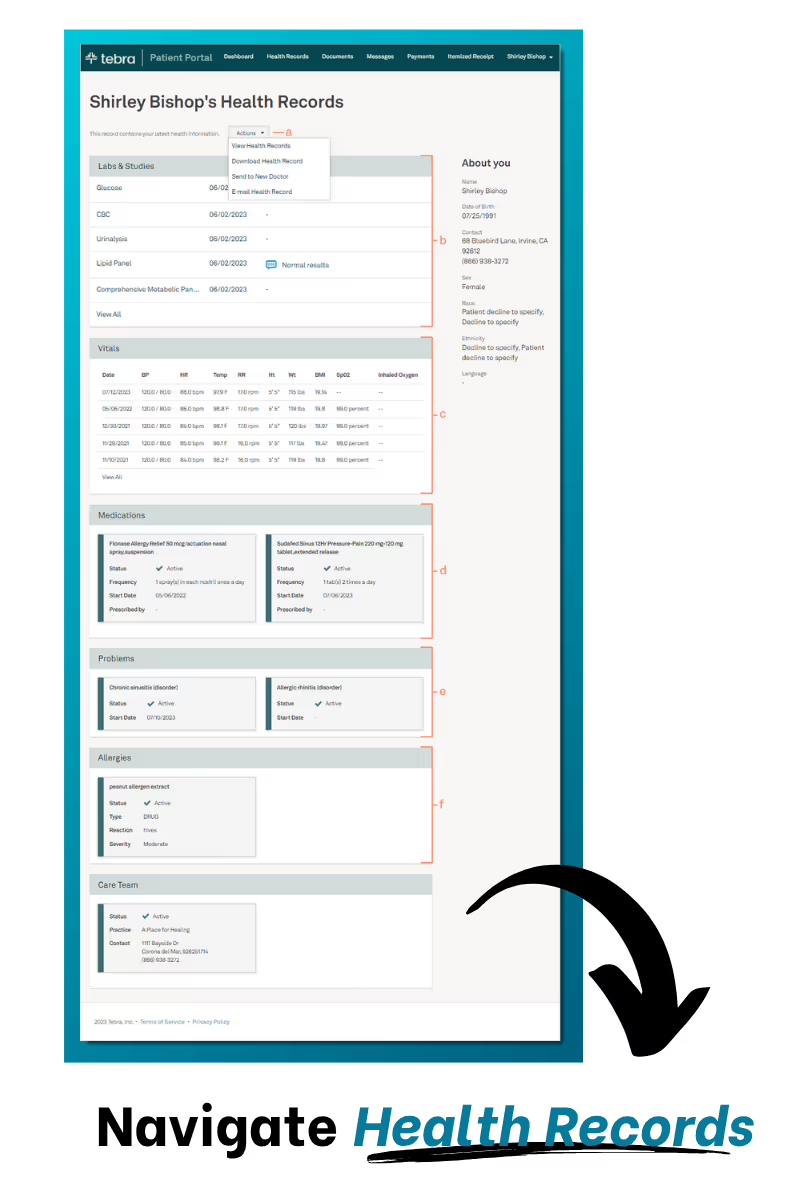
Navigate Health Records
After clicking View Health Records from the Dashboard, the patient can review their health information.
- Actions: Click to view, download, send by direct message, or email the summary of care.
- Labs & Studies: Displays recent eLab orders and applicable notes.
- Click View All to display all labs.
- Click on the lab to view results and provider comments.
- Vitals: Displays recorded vitals.
- Medications: Displays active medications.
- Problems: Displays active problems.
- Allergies: Displays active allergies.
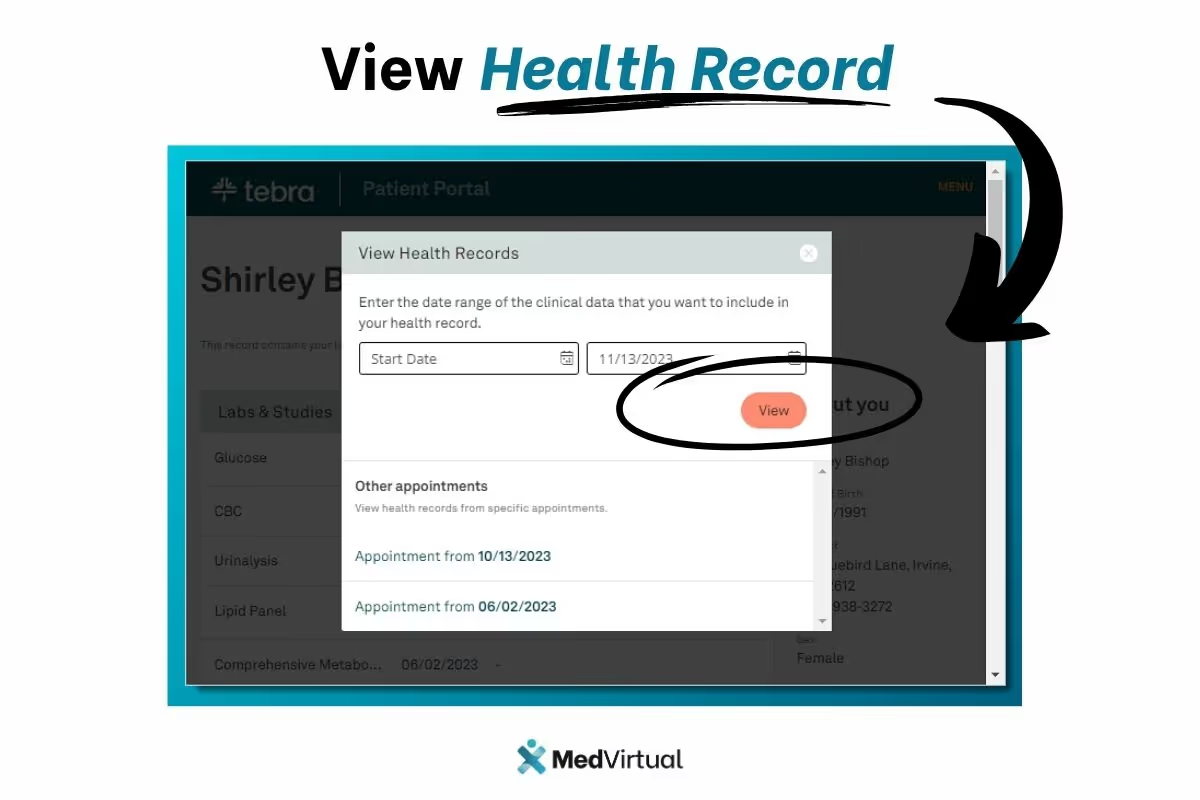
View Health Record
From the Health Records page, the patient can view their health records for a specific time frame.
- Click Action and select View Health Record. The View Health Records pop-up window opens.
- View all health records or by specific appointments:
- To view all health records, select the date range. Then, click View. The summary of care opens in a new browser.
- To view health records from specific appointments, click the Appointment Date. The summary of care opens in a new browser.
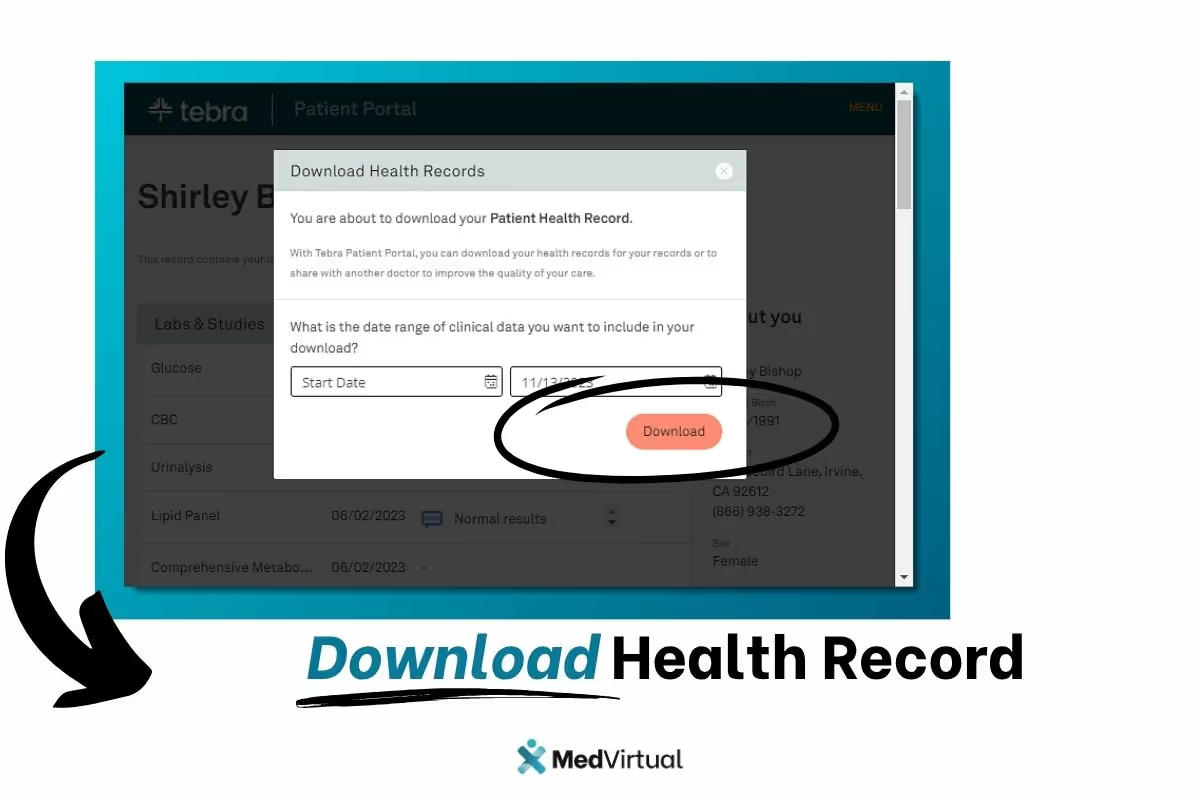
Download Health Record
From the Health Records page, the patient can download their health records.
- Click Action and select Download Health Record. The Download Health Records pop-up window opens.
- Select the date range.
- Click Download. A zip file is saved containing the XML files.
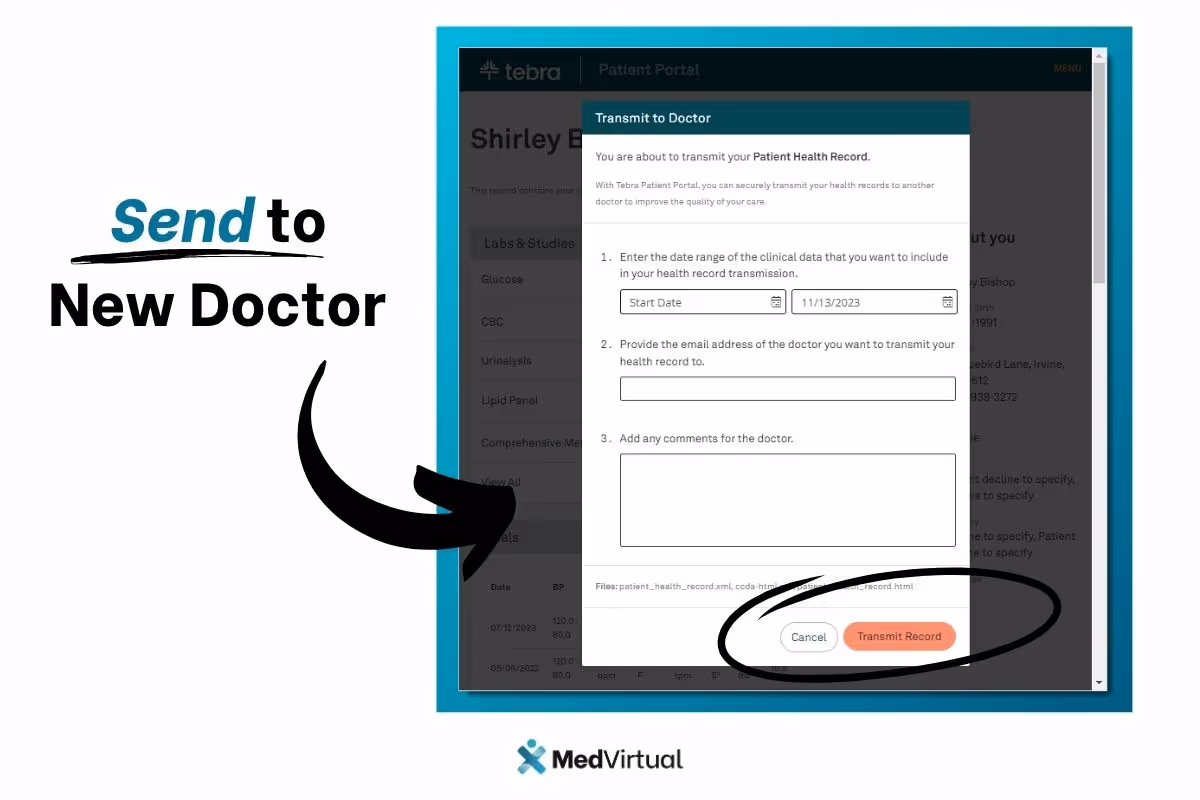
Send to New Doctor
From the Health Records page, the patient can send their health record to another provider. Patient must have the provider's direct message address to use this feature.
- Click Action and select Send to New Doctor. The Transmit to Doctor pop-up window opens.
- Select the date range.
- Enter the provider's email address and optionally add comments.
- Click Transmit Record when finished.
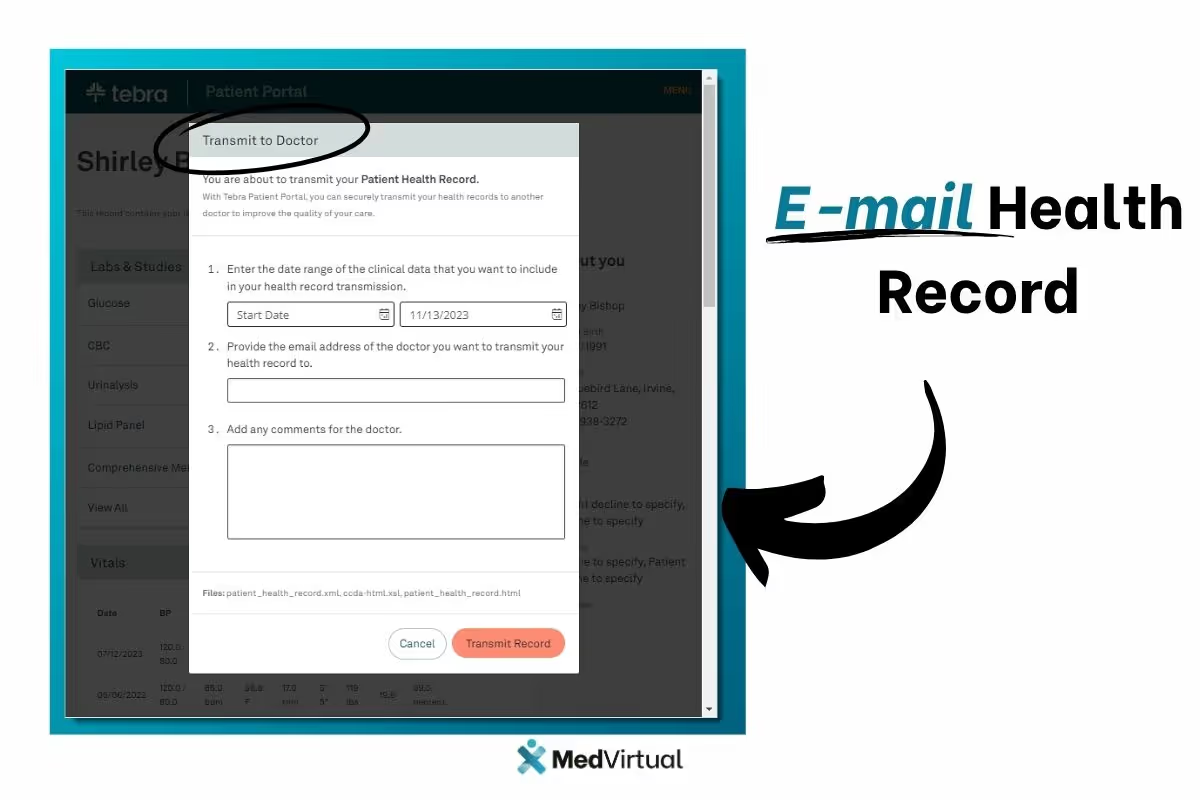
E-mail Health Record
From the Health Records page, the patient can send their health record to another provider.
- Click Action and select E-Mail Health Record. The Transmit to Doctor pop-up window opens.
- Select the date range.
- Enter the provider's email address and optionally add comments.
- Transmit Record when finished.
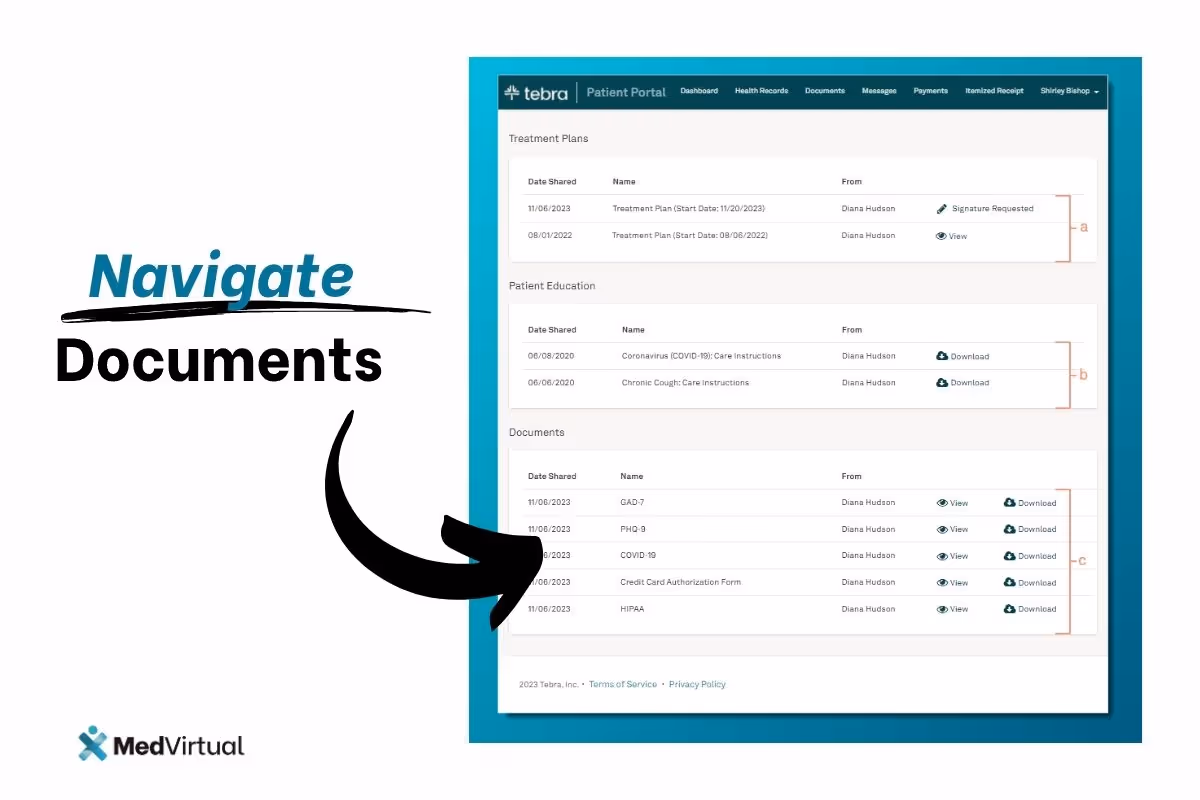
Navigate Documents
After clicking View Documents from the Dashboard, the patient can review documents shared by the practice.
- Treatment Plans: Displays treatment plans that requires a signature by the patient and shared treatment plans. Click to view details and optionally download.
- Patient Education: Displays sent patient educations. Click Download to save the file.
- Documents: Displays sent patient documents.
- To see the document, click View.
- To save the document, click Download.
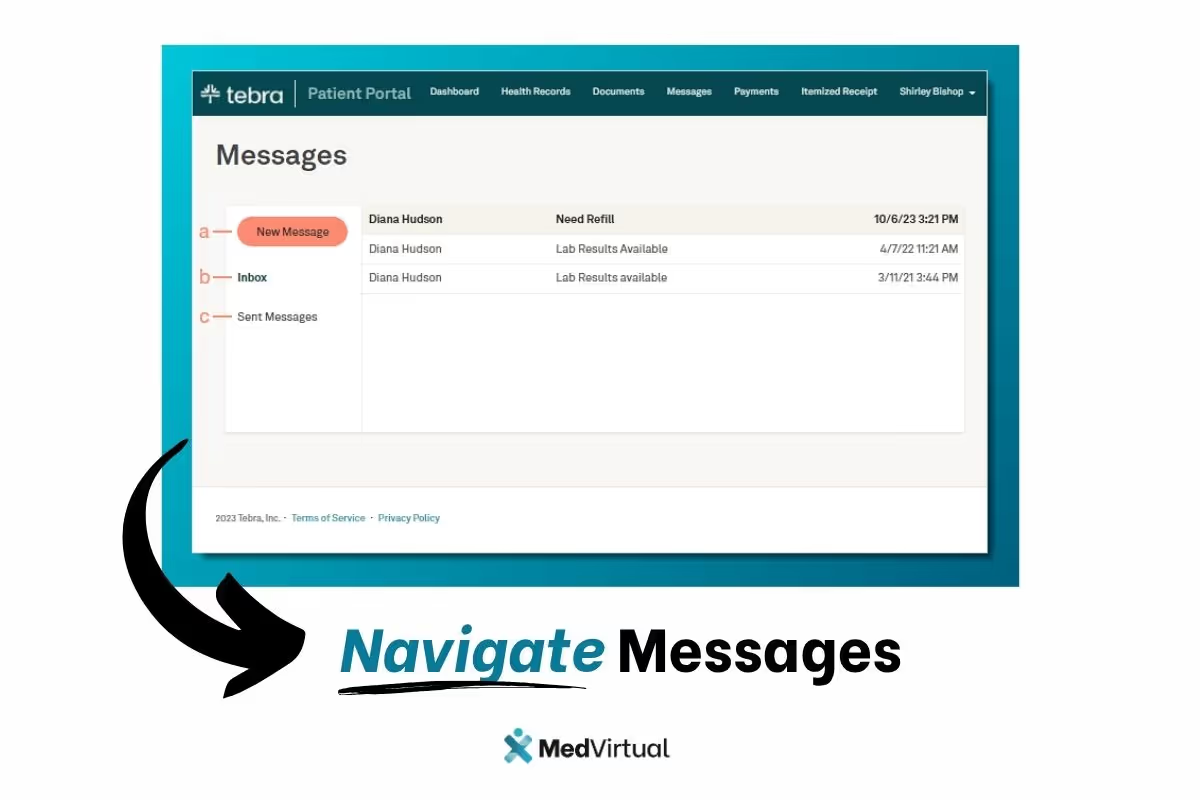
Navigate Messages
After clicking View Messages from the Dashboard, the patient can review messages sent by the practice or send a message to the provider.
- New Message: Send new secure message to the provider.
- Inbox: Displays messages sent by the provider.
- Sent Messages: Displays message sent to the provider.
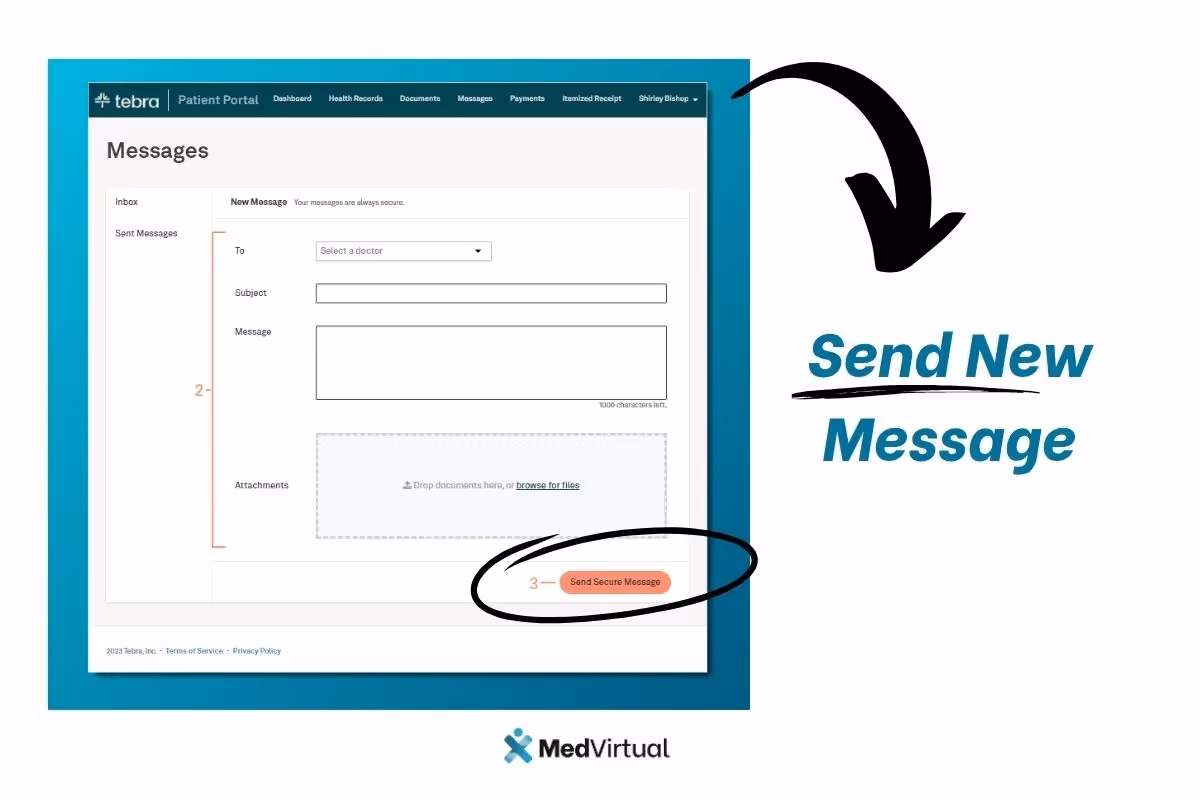
Send New Message
From the Messages page, patients can send a message to the provider.
- Click New Message. The New Message page opens.
- Compose message:
- Select a provider from the To drop-down.
- Enter the Subject and Message to the provider.
- Optionally, attach an image or document (not to exceed 10MB).
- Click Send Secure Message when finished. The message display in the provider's Message Center.
Navigate Payments
After clicking Make a Payment from the Dashboard, the patient can review their outstanding balance and detailed bills. Practices must be Tebra Payments or Patient Collect (Stripe) activated for patients to access the payments section.
- Current Balance: Displays the current patient balance. Click Make a Payment to pay the balance online or click View your Bill to see the breakdown of the bill or the print the statement.
- Previous Portal Payments: Displays previous payments made through the . Click View previous payments to see additional payments.

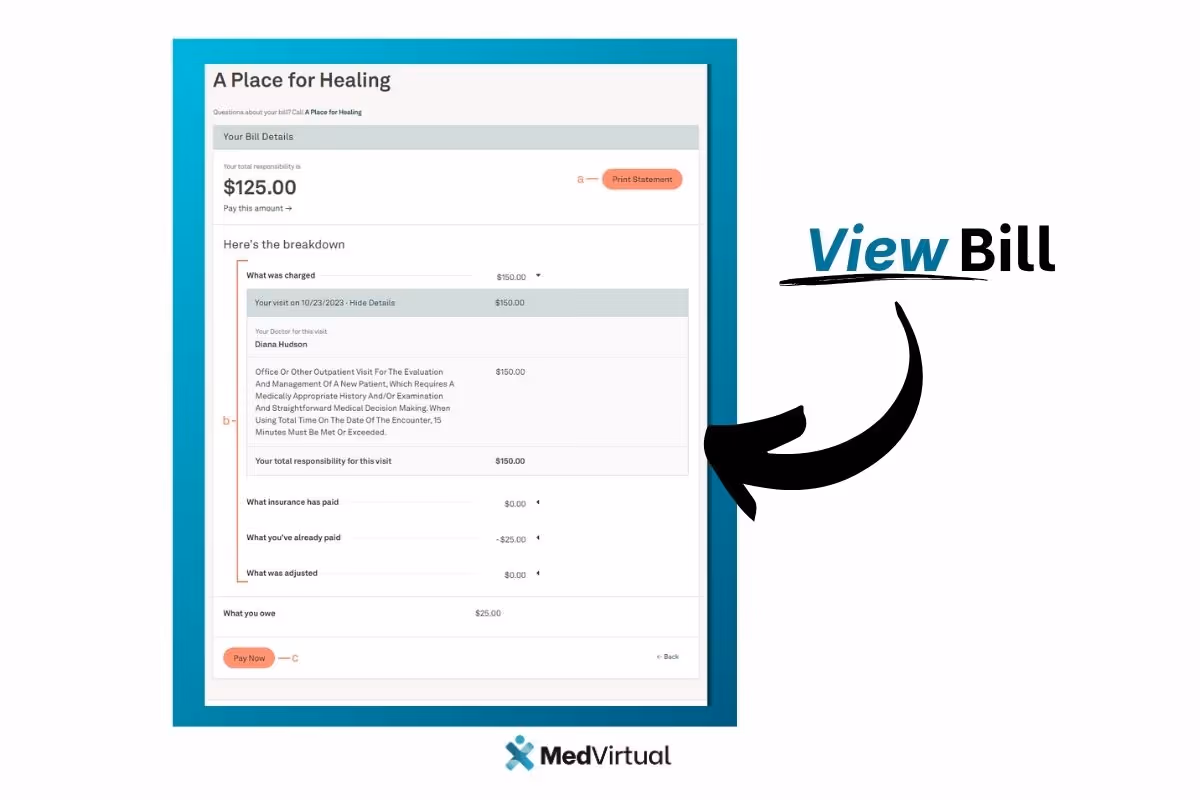
View Bill
After clicking View Your Bill from the Payments page, the patient can review their bill details.
- Print Statement: Click to print the details of the page.
- Review the breakdown:
- Click View Details to display which code(s) was billed for the specific visit and the breakdown of applicable insurance payments and adjustments.
- Review total insurance payment, patient payment, and adjustments.
- Payment: Review the patient balance. Click Pay this amount at the top of the page or Pay Now at the bottom of the page to make a payment.
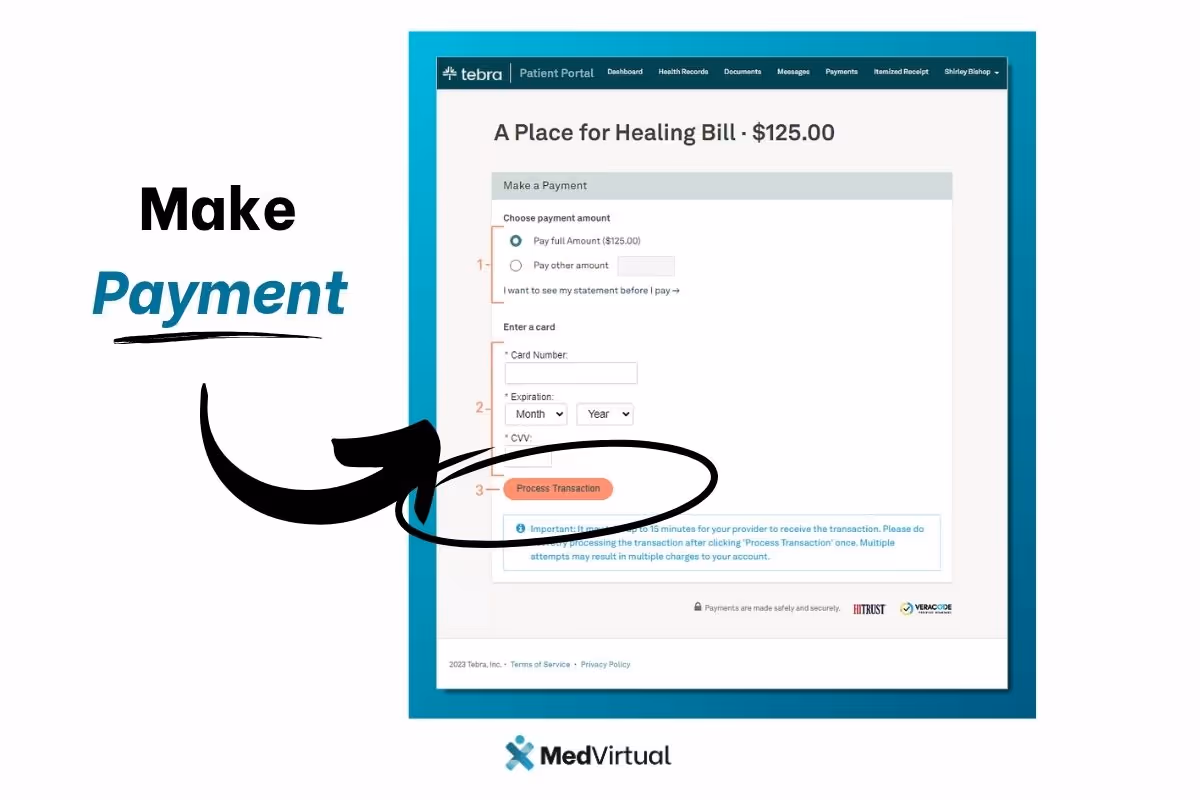
Make Payment
After clicking Make a Payment from the Payments page, the patient can make a payment online to pay their balance. This feature is available for patients when the practice has Tebra Payments or Patient Collect (Stripe) activated.
- For Patient Collect (Stripe) activated practices, review Patient Experience: Patient Portal Payment (Stripe) for more details.
- For Tebra Payments activated practices, review the following steps.
- The patient clicks to select the payment amount to pay. The patient can click I want to see my statement before I pay to view their statement first.
- The patient selects "Pay full Amount" to pay the total amount owed.
- The patient selects "Pay other amount" to enter a different payment amount.
- The patient enters the Card Number, Expiration Date, and CVV code. Note: If any of the card information needs to be corrected after it was entered, all card information fields will automatically clear for security purposes.
- The patient clicks Process Transaction to charge the card. The Payment Successful page opens with a receipt and the option to print.
- The patient clicks to select the payment amount to pay. The patient can click I want to see my statement before I pay to view their statement first.
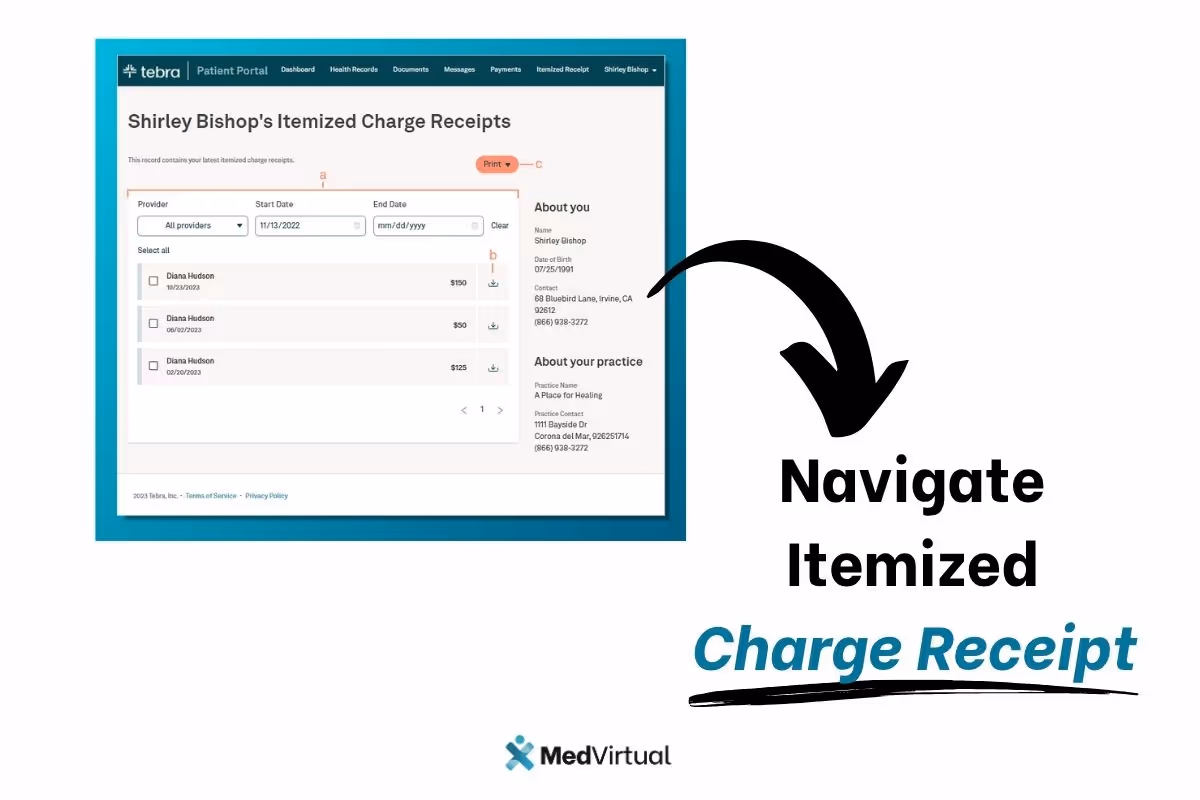
Navigate Itemized Charge Receipt
After clicking View Receipts from the Dashboard, the patient can review their itemized receipts. The practice must enable the Receipt on Patient Portal setting, for patients to access this section.
- Filter: By default, all receipts from the last year to current date displays. To change the filters, click the Provider, Start Date, or End Date drop-down.
- To reset the filters, click Clear filters.
- Download: Click the download icon on a visit to save a PDF of the itemized receipt.
- Print: Generate a PDF for multiple visits or all visits. Click to select specific visits and click Select all. Then, click to expand the Print options and select Separate receipts to generate a PDF for each visit or select Combine all visits in a single receipt to generate a PDF of all visits on one receipt, when applicable. Note: Only visits for the same practice and service location can be combined in a single receipt.
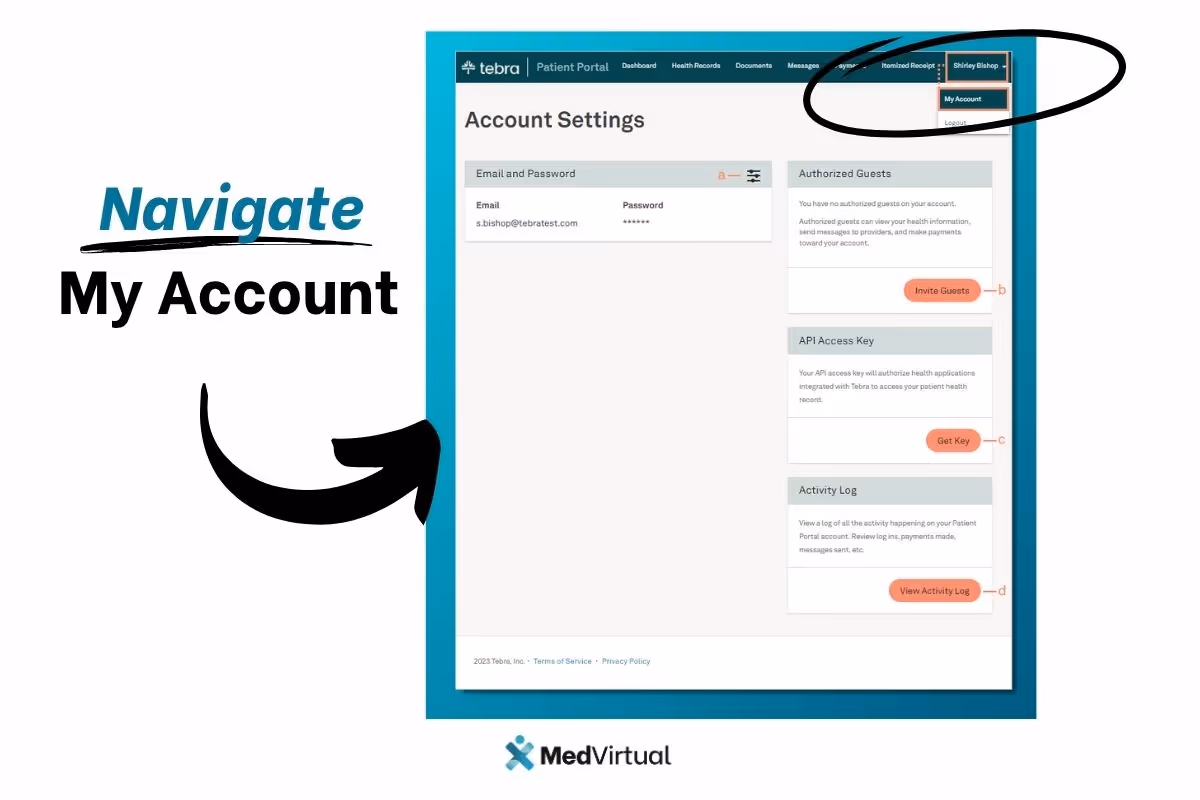
Navigate My Account
Grant access to an authorized user to view the patient's account or change the password. The only settings the patient can update is their password.
- Account Settings: Displays the email address associated to the account. Click the settings icon to reset the password.
- Authorized Guests: Click Invite Guests to allow authorized users to view the patient's health information, send messages, and make payments. To deny access to an authorized guest, click Revoke next to the guest's name. Authorized users do not have access to the Account Settings or Authorized Guests sections.
- API Access Key: Click Get Key to generate the API access key that authorizes health applications to integrate with Tebra to access the patient's health record. To deny the generated API key, click Revoke. Then, click Revoke Access on the confirmation pop-up window.
- Activity Log: Click View Activity Log to review log ins, payments made, messages sent, and more.
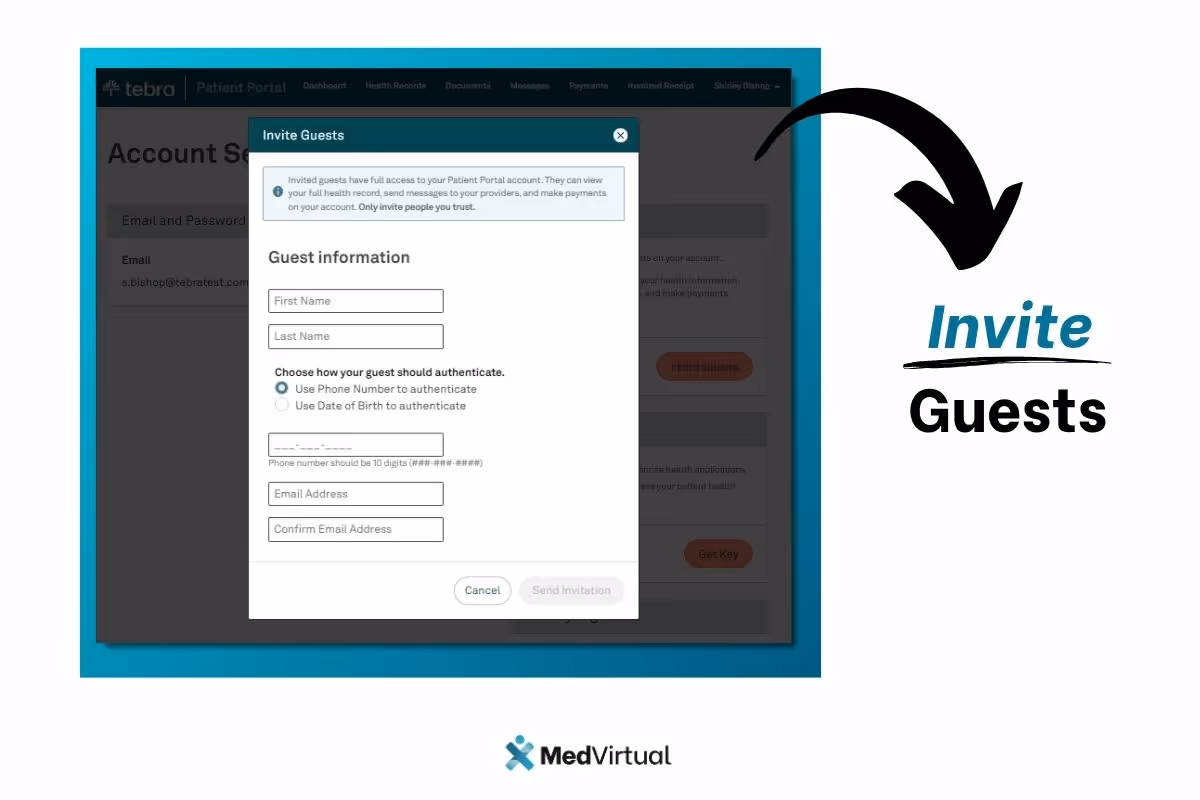
Invite Guests
From the My Account page, patients can invite other users (e.g., family members) to view their health information, send messages, and make online payments.
- Invite Guests. The Invite Guest pop-up window opens.
- Enter the Guest First and Last Name
- Select how the guest authenticates.
- Enter the Guest Phone Number or Date of Birth and Email Address
- Click Send Invitation. The confirmation pop-up window opens and an email invitation is sent to the invited guest.
- Continue to add additional guests or click I'm done to close the pop-window.
Invited Guest: Authenticate and Access Account
After the guest is invited to the Patient Portal, they will need authenticate their information to access the patient's account.
- The guest receives an email invitation and click Get Started. The Authenticate page opens in a new browser.
- The guest enters their phone number or date of birth for authentication and clicks Log into account. The Your Accounts page opens.
- If the guest does not have a account, create a password. Then, click Create Account. The Your Accounts page opens.

- Select an account to view.
- If the guest has not been invited to the by a provider or practice, their name will not display on the list.

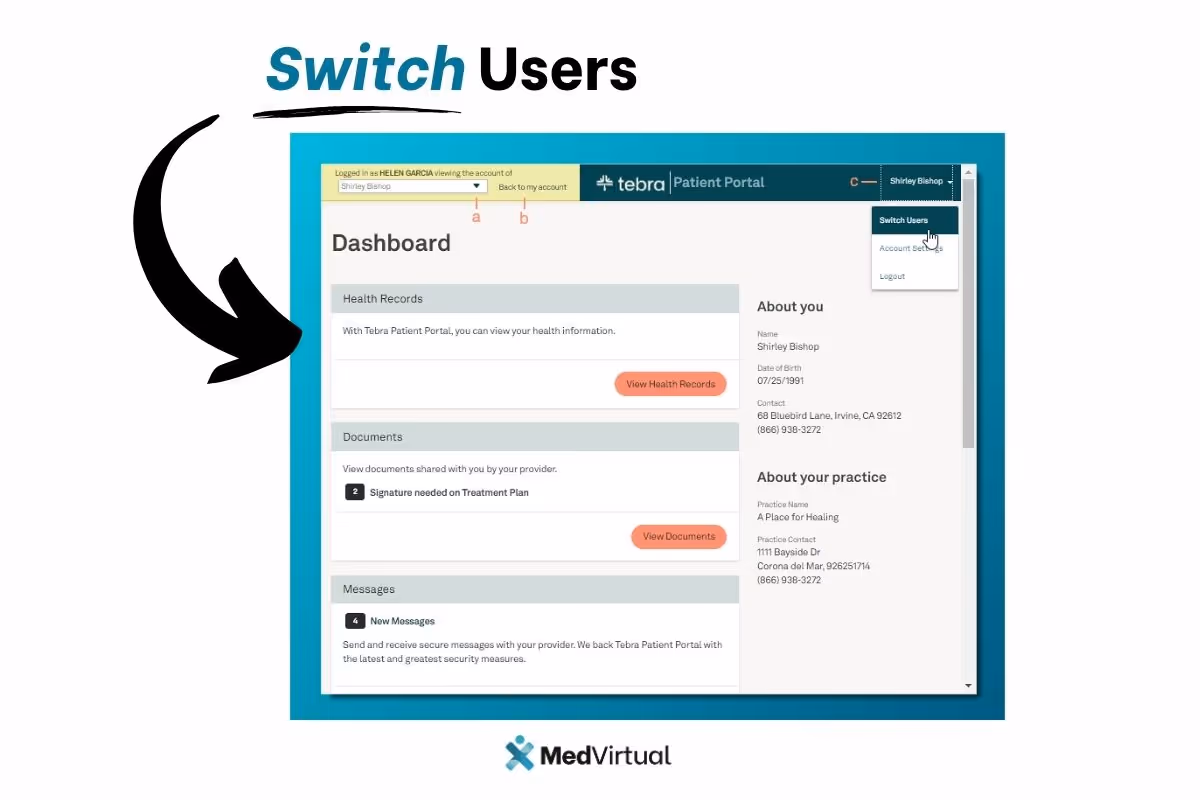
Invited Guest: Switch Users
After an invited guest logs in, they can view their own health information and switch to another patient's account, when applicable.
Note: If the guest has not been invited to the by a provider or practice, they will not have access to the options below.
- Click the drop-down to select a user.
- Click Back to my account to view their health information.
- Click Patient Name and select Switch Users. The Your Accounts page opens to select a different account.
Transitioning from Kareo to Tebra Patient Portal
For users familiar with the Kareo platform, transitioning to the Tebra Patient Portal offers a seamless and enhanced experience. Tebra builds upon the trusted features of Kareo, integrating advanced functionalities that support independent healthcare practices more effectively. Patients who have previously used Kareo can easily activate their accounts on the Tebra Patient Portal using their existing credentials or follow the straightforward activation process if they are new users.
The Tebra platform maintains the core benefits of Kareo’s electronic health record (EHR) system while introducing an all-in-one platform approach that streamlines care delivery and patient care management. With Tebra, practices can continue to provide excellent service with added tools such as online scheduling, secure messaging, and digital payment options, all accessible through the patient portal.
This transition ensures that providers and patients experience minimal disruption while gaining access to enhanced features designed to improve communication, engagement, and access to health records. Whether you are an independent practice or part of a larger healthcare network, the Tebra Patient Portal offers a modernized solution built on the foundation of Kareo’s trusted technology.
Get Started with the Tebra Patient Portal Today
Experience the convenience and efficiency of managing your healthcare online with the Tebra Patient Portal. Whether you are a patient looking to access your health records, communicate securely with your provider, or make online payments, Tebra offers an all-in-one platform designed to enhance your patient experience.
If you are a healthcare provider, empower your patients by offering seamless access to their medical information and simplify your practice management with Tebra’s integrated solutions. Join the growing number of independent practices and providers who trust Tebra to modernize care delivery and improve patient engagement.
Activate your Tebra Patient Portal account today or contact your healthcare provider to learn more about how Tebra can help you take control of your health journey with ease and confidence.

Frequently Asked Questions (FAQ) about the Tebra Patient Portal
Q1: What is the Tebra Patient Portal?
The Tebra Patient Portal is a secure, user-friendly online platform that allows patients to access and manage their health records, communicate with providers, view bills, make payments, and authorize guest access for family members or caregivers.
Q2: How do I activate my Tebra Patient Portal account?
After your healthcare provider invites you, you will receive an email with an invitation link. Click Get Started in the email, create a password, enter your date of birth, and complete the account creation process to activate your portal.
Q3: Can I access the Tebra Patient Portal from any device?
Yes, the portal is accessible from any computer, tablet, or mobile device with internet access through a web browser.
Q4: What features can I access through the Tebra Patient Portal?
You can view your health records including medications, allergies, lab results, and treatment plans. You can also send and receive secure messages with your provider, make online payments, view bills and payment history, download itemized receipts, and authorize guest access.
Q5: How do I authorize access for a family member or caregiver?
Within the portal, you can invite guests by entering their details and sending an email invitation. Authorized guests can then securely view your health information, send messages, and make payments on your behalf.
Q6: Is my information secure on the Tebra Patient Portal?
Yes, the Tebra Patient Portal is HIPAA-compliant and uses industry-standard security measures to protect your personal health information.
Q7: What should I do if I forget my password?
On the login page, click the “Forgot Password” link to reset your password by following the prompts sent to your registered email address.
Q8: Can I download or send my health records from the portal?
Yes, you can download your health records for specific time frames or send them securely to another healthcare provider via direct messaging or email.
Q9: How do I make an online payment through the portal?
Navigate to the Payments section, review your current balance or bills, and follow the prompts to enter your payment details and complete the transaction securely.
Q10: What if I have questions or need help using the portal?
Contact your healthcare provider’s office for assistance or support related to the Tebra Patient Portal. Many practices also provide tutorials or guides to help you navigate the system.