How to Register with Office Ally in 2025
Office Ally is a leading platform designed to simplify the administrative side of healthcare. From claim submissions and eligibility verifications to electronic health records and revenue optimization, it offers a full suite of services that help healthcare providers operate more efficiently.
As a solo practitioner, a billing company, or part of a larger medical group, registering with Office Ally gives you access to tools that support smoother workflows, faster reimbursements, and better compliance. It’s especially valuable for practices looking to reduce manual paperwork and integrate secure digital processes into their day-to-day operations.
This step-by-step guide will walk you through Office Ally registration process as of 2025. It briefly breaks down each of the 11 steps, using clear instructions to help you set up your account correctly from the start.
If you’re ready to improve your billing operations and streamline your healthcare practice, this guide will help you get started with Office Ally quickly and confidently.
What Is Office Ally and Why Use It?
Office Ally is a cloud-based healthcare technology platform that connects providers, payers, and billing professionals through an all-payer clearinghouse and integrated suite of practice management tools. It offers a centralized solution for streamlining administrative tasks that are essential to running a modern healthcare practice.
At its core, Office Ally enables healthcare providers to submit claims electronically, verify patient eligibility in real time, and access remittance advice, all through a secure, HIPAA-compliant system. But its value extends far beyond claim submissions.
Office Ally includes:
- Clearinghouse Access
Submit and track real-time and batch transactions across thousands of payers. - Claim Copilot (Service Center)
A portal that allows users to create claims, check patient eligibility, and receive remittance advice without switching between platforms. - Insurance Discovery
A feature that identifies billable insurance for patients whose insurance details may be missing or incorrect, helping recover lost reimbursement opportunities. - Practice Mate
A free practice management system that helps manage patient scheduling, demographics, and billing from one dashboard. - EHR 24/7
A certified electronic health record system designed to support clinical documentation, order management, and electronic prescribing.
In addition to these features, Office Ally is compliant with major industry standards, including HIPAA and HITRUST certifications, making it a reliable partner for practices that prioritize data security and regulatory compliance.
For providers seeking to reduce administrative burdens while improving operational efficiency, Office Ally offers a no-cost or low-cost entry point with tools that scale as your practice grows.
Office Ally Registration Requirements
Before beginning the registration process with Office Ally, it's helpful to gather a few essential details to ensure a smooth setup. The process is straightforward, but having the right information ready will save you time and prevent interruptions.
To register your practice with Office Ally, you’ll need the following:
- A valid email address
This will be used for account verification and future communication. Make sure it’s one you check regularly. - Practice contact information
Include your organization’s legal name, phone number, and mailing address (street, city, state, ZIP code). - Your preferred username and password
Choose a secure password that meets standard best practices. Office Ally will require this to access your account dashboard. - Entity classification
You’ll be asked to identify the type of healthcare organization you operate, such as a solo practice, group practice, hospital, billing service, or IPA (Independent Physician Association). - Internet access via a secure browser
Office Ally is a web-based platform, so you’ll need a reliable internet connection and a secure, up-to-date browser such as Chrome, Firefox, or Edge.
While most providers can complete registration in 10 to 15 minutes, being prepared with the information above can make the process even faster. Once you’ve gathered these essentials, you’re ready to begin the 11-step Office Ally registration process.
Step-by-Step Registration Guide
Follow these 11 detailed steps to register your account on Office Ally and begin using its full range of provider services. Each step corresponds to an actual screen or form in the registration portal, ensuring you know exactly what to expect.
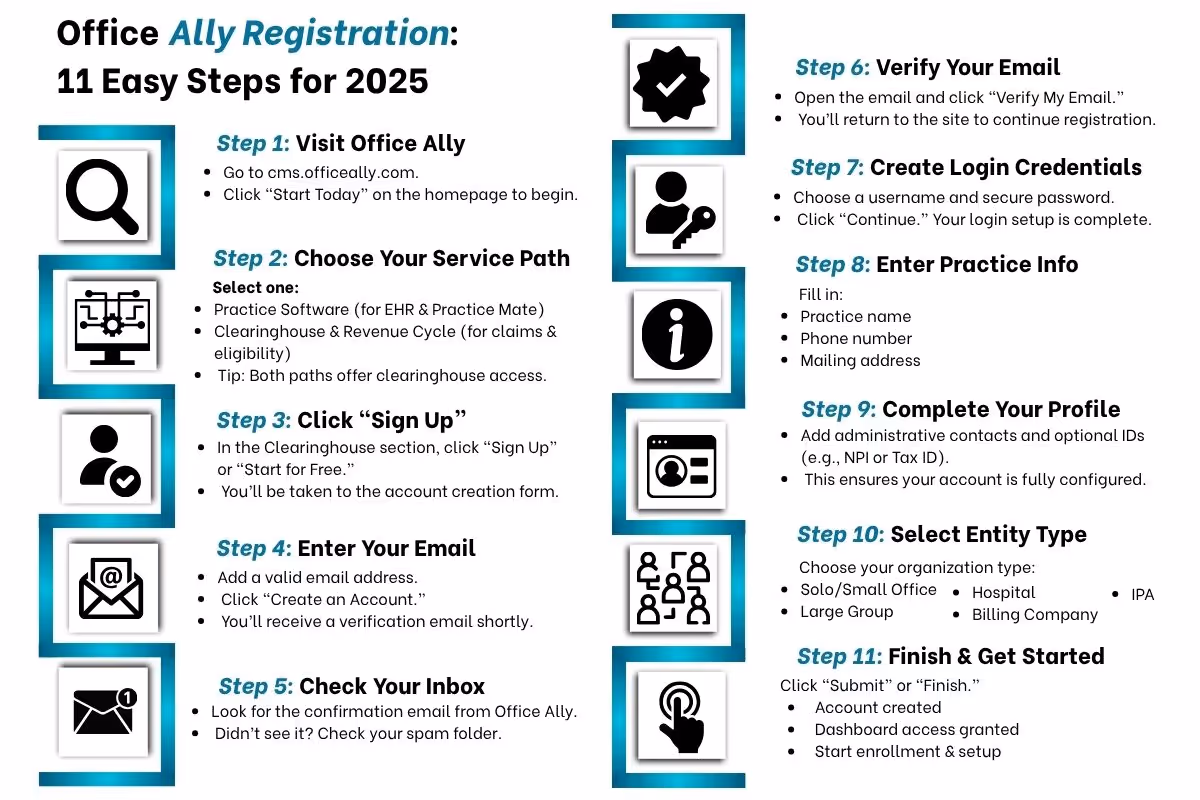
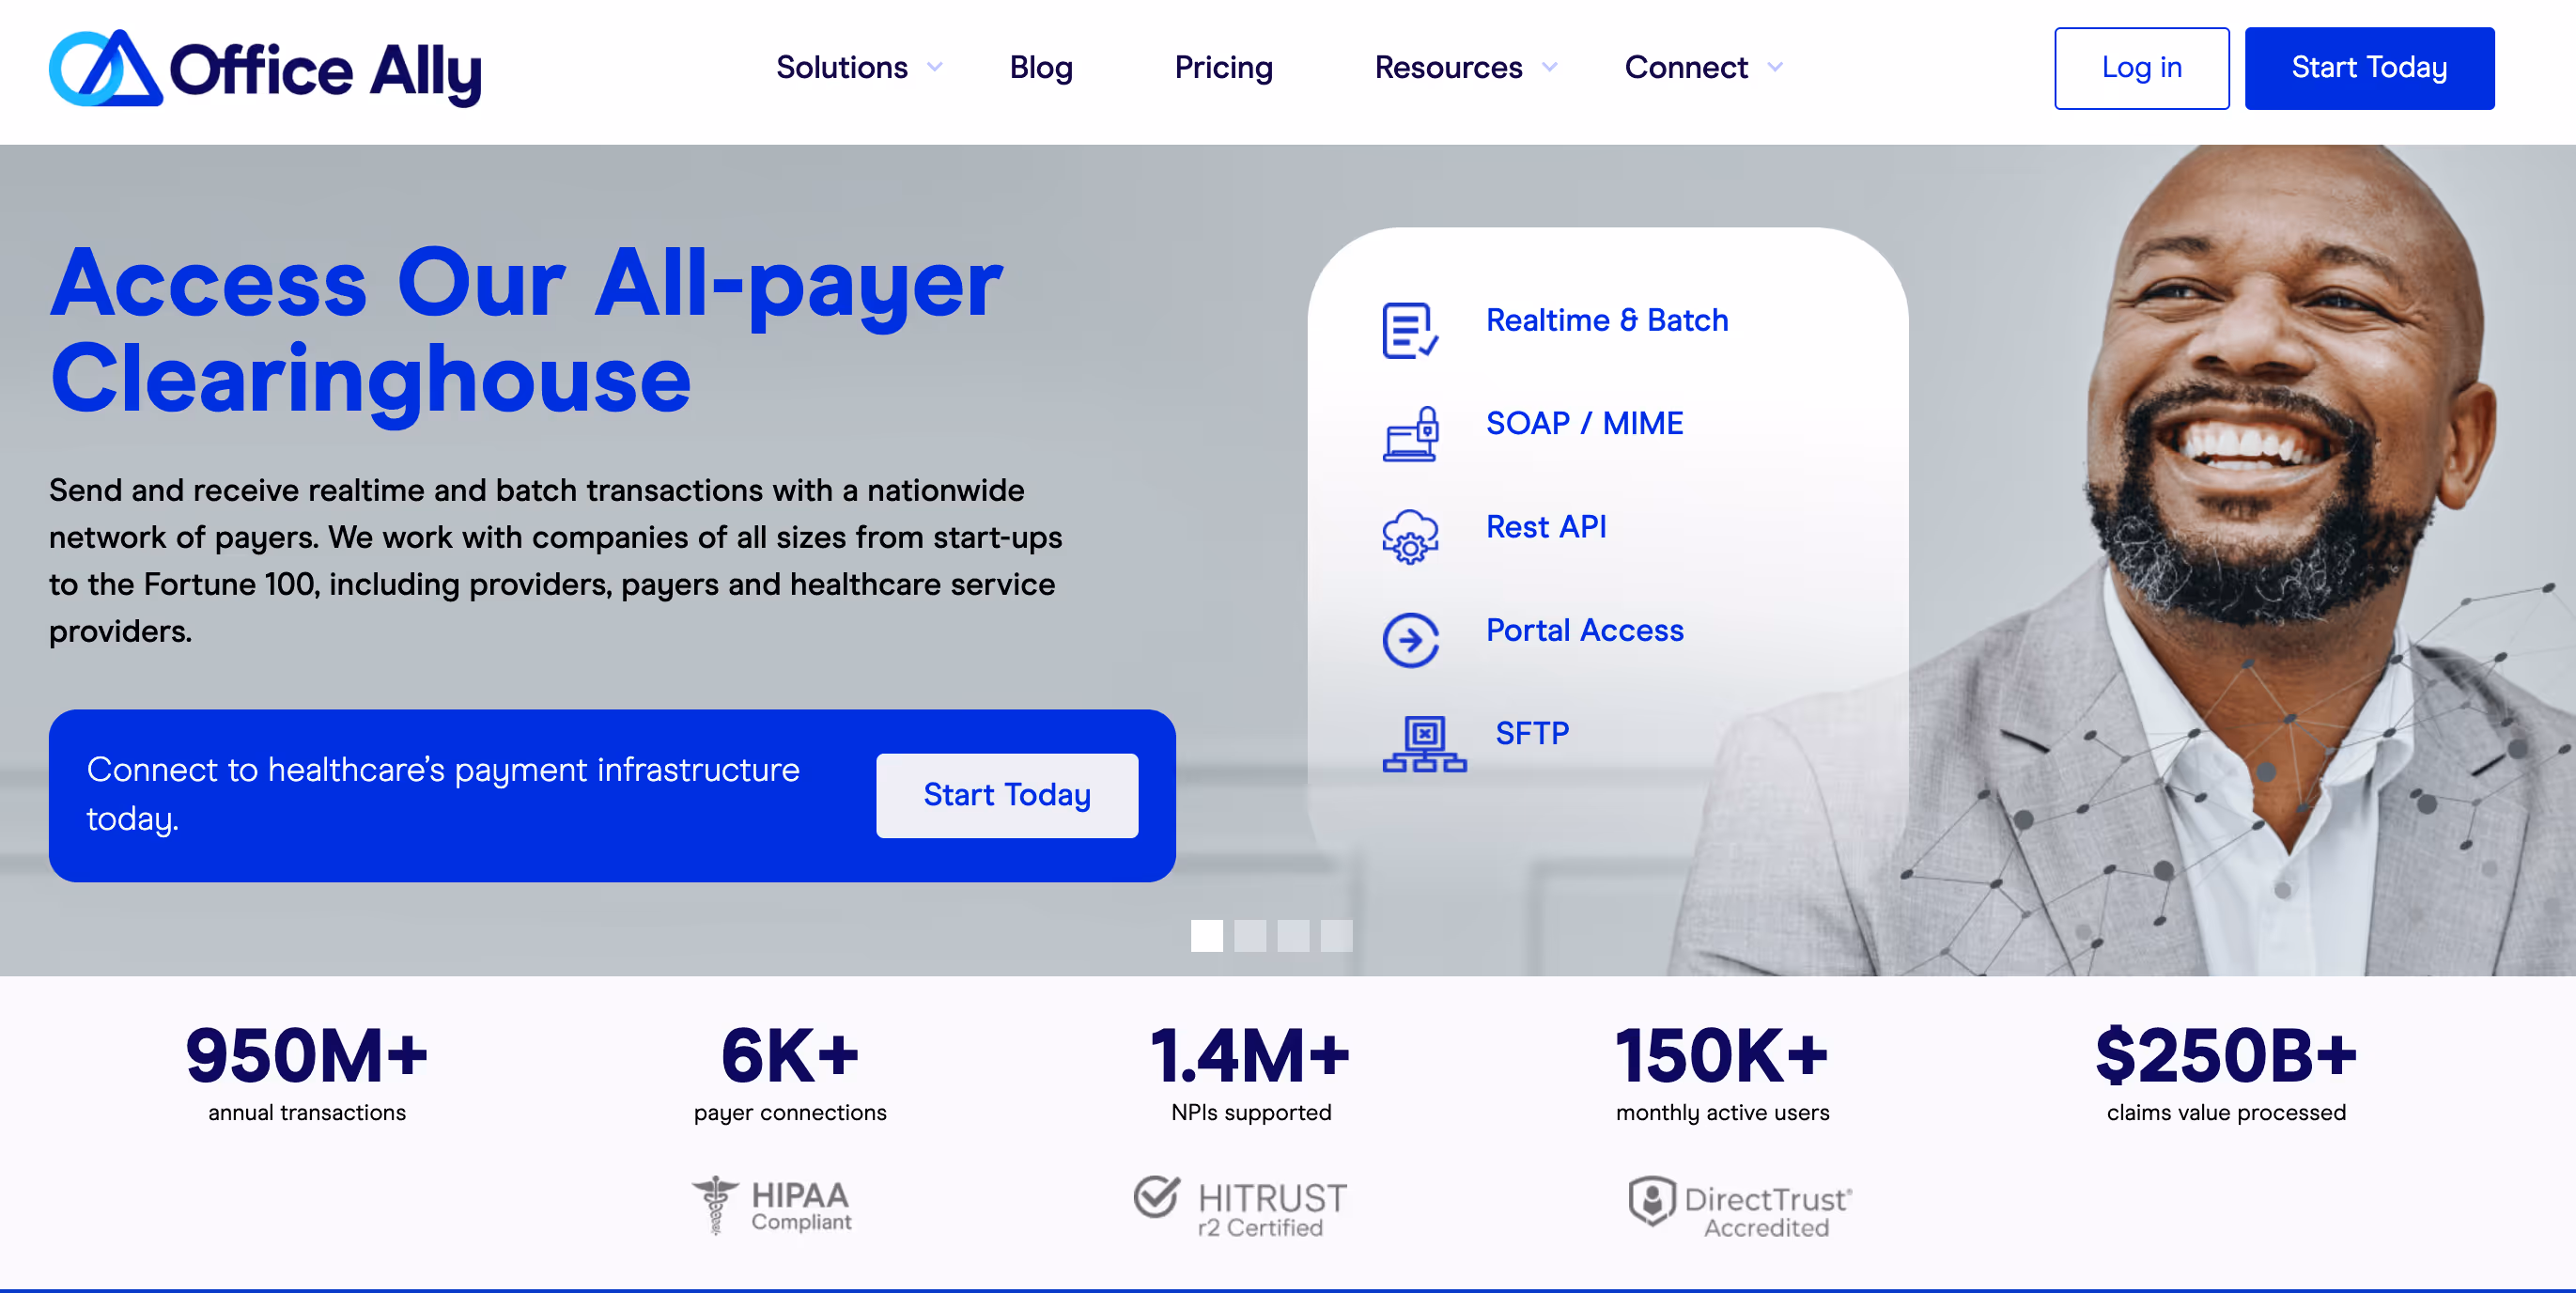
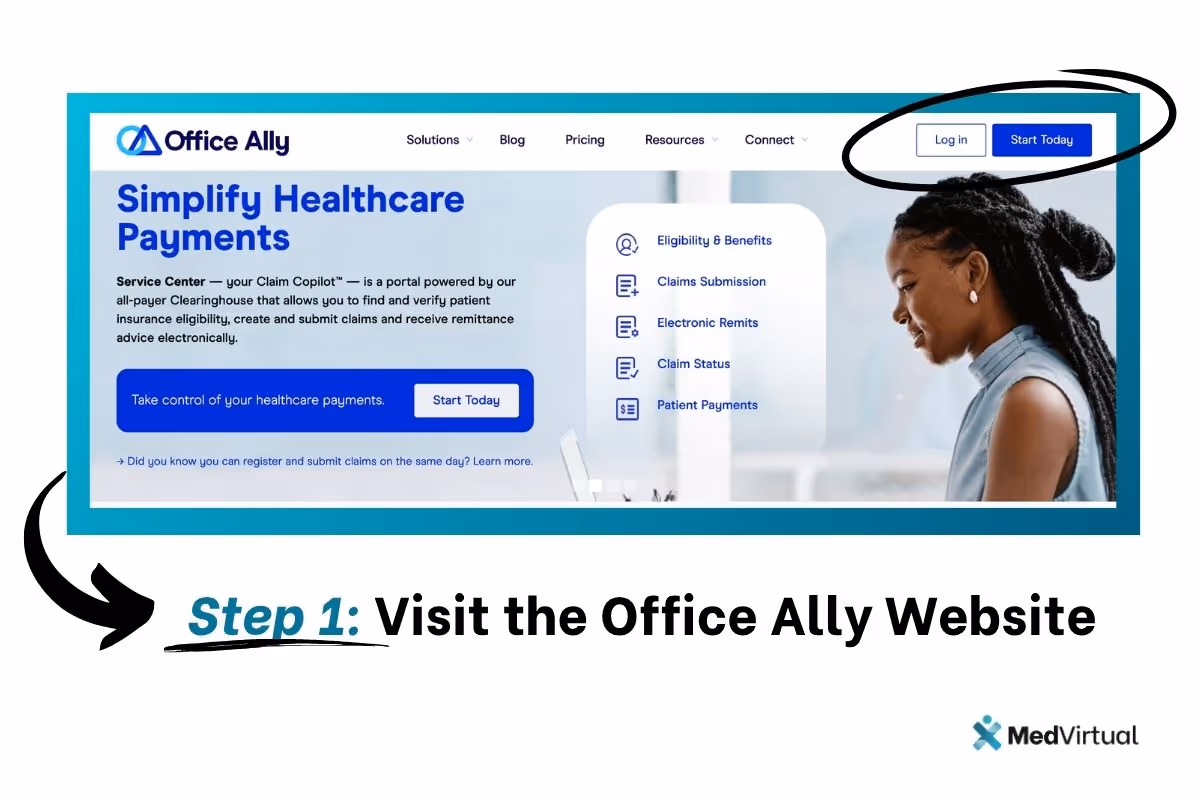
Step 1: Visit the Office Ally Website
To begin, go to the official Office Ally site at:
On the homepage, look for the “Start Today” button. This is typically located in the top right corner or within the main header section. Clicking it will take you to the service selection screen.
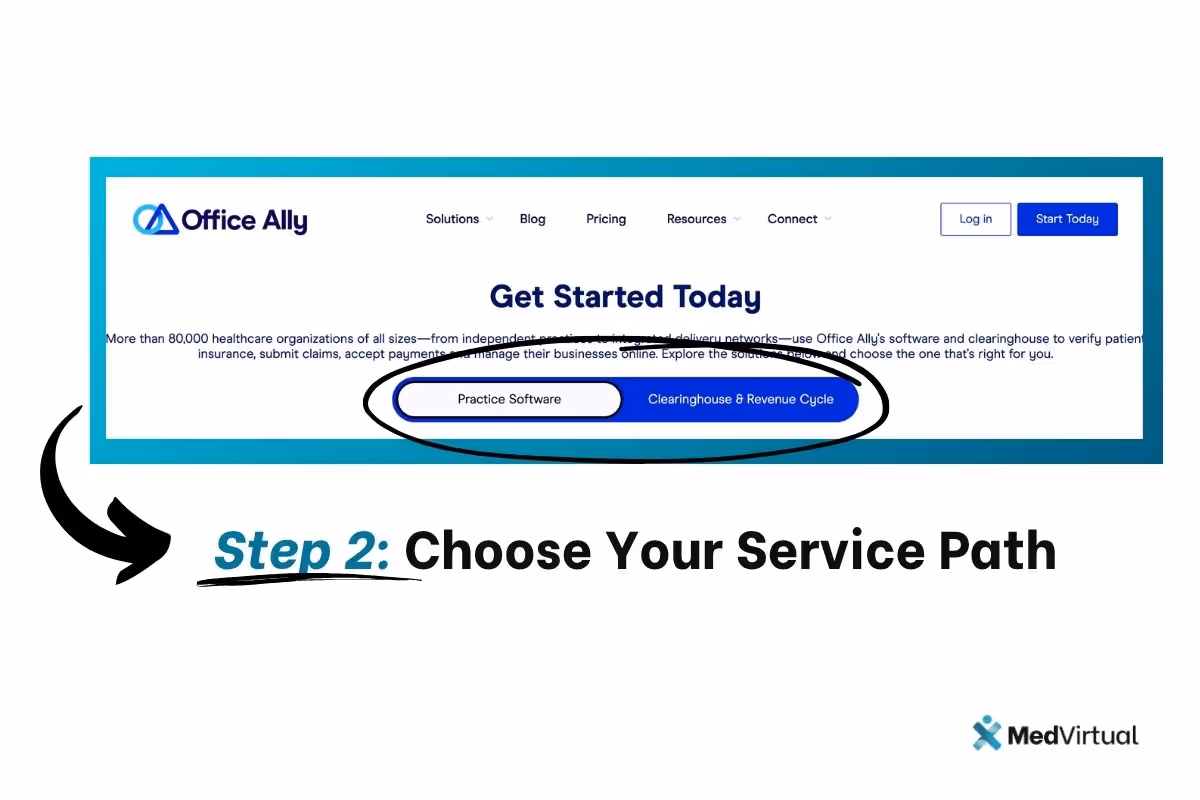
Step 2: Choose Your Service Path
Once you're on the selection page, you’ll be presented with two options:
- Practice Software
Choose this if you're primarily interested in Office Ally’s Practice Mate and EHR 24/7 tools for scheduling, documentation, and clinical workflows. - Clearinghouse & Revenue Cycle
Choose this if your main focus is claims processing, insurance eligibility, and payment reconciliation.
Note: Both paths lead to Clearinghouse access, so either option works for registering your provider account. Select the one that most closely aligns with your practice needs.
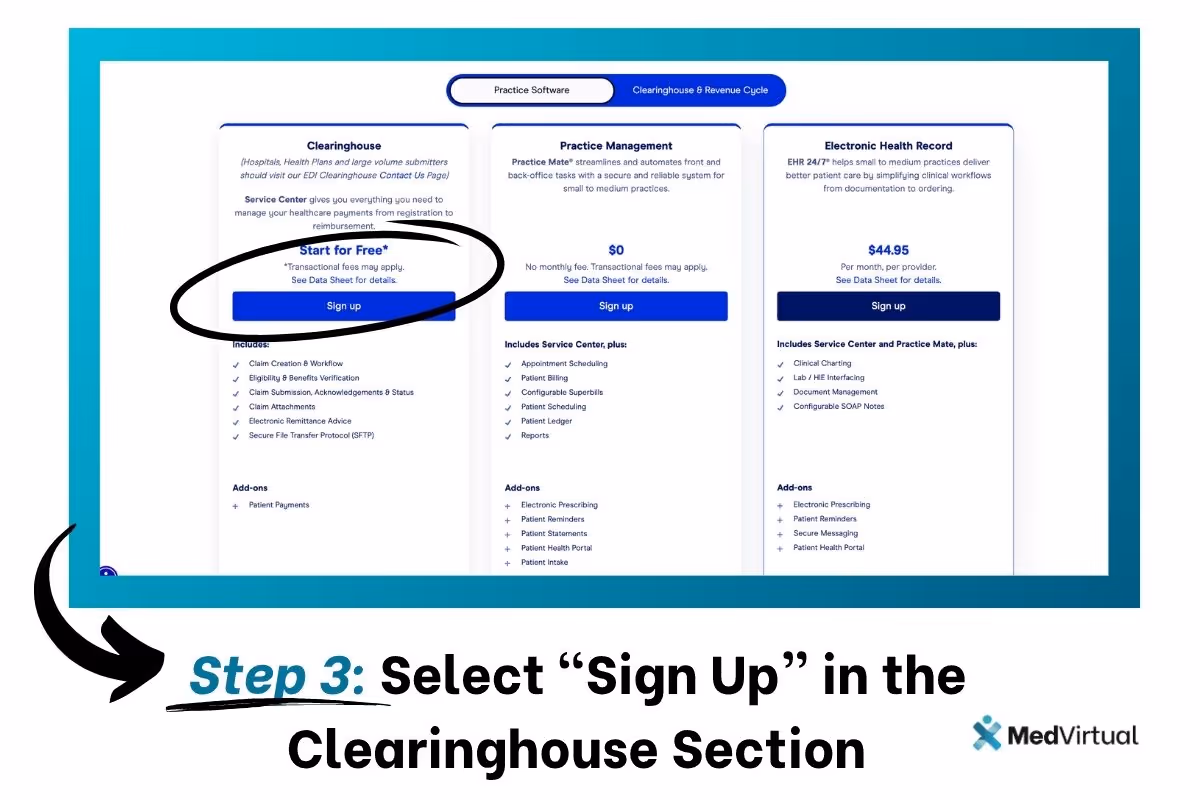
Step 3: Select “Sign Up” in the Clearinghouse Section
After selecting your service track, scroll to the Clearinghouse section and click the “Sign Up” or “Start for Free” button. This action will begin the registration process.
You’ll be directed to a secure form where you’ll enter your account information, starting with your preferred email address.
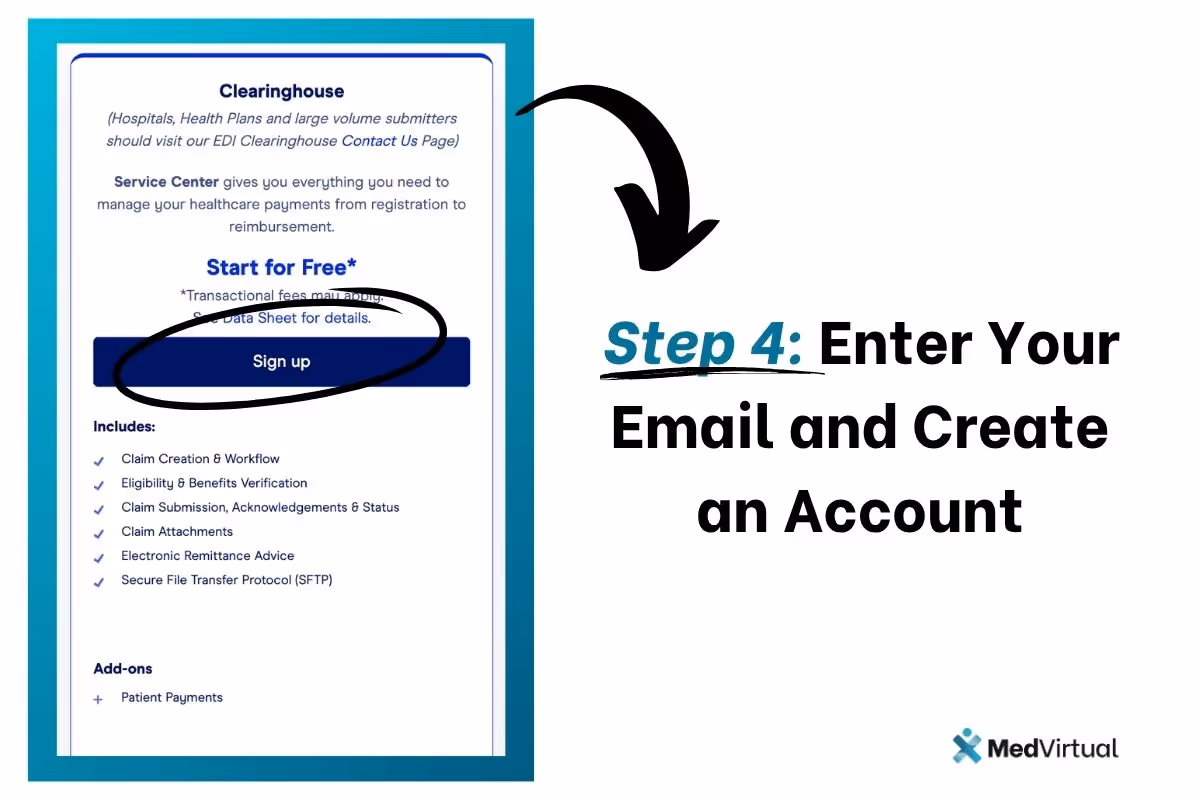
Step 4: Enter Your Email and Create an Account
On the email entry page, input the email address you wish to associate with your Office Ally account. Make sure this email is accessible, as it will be used for verification and ongoing communications.
After entering your email, click “Create an Account.” Office Ally will immediately generate and send a verification email to your inbox.
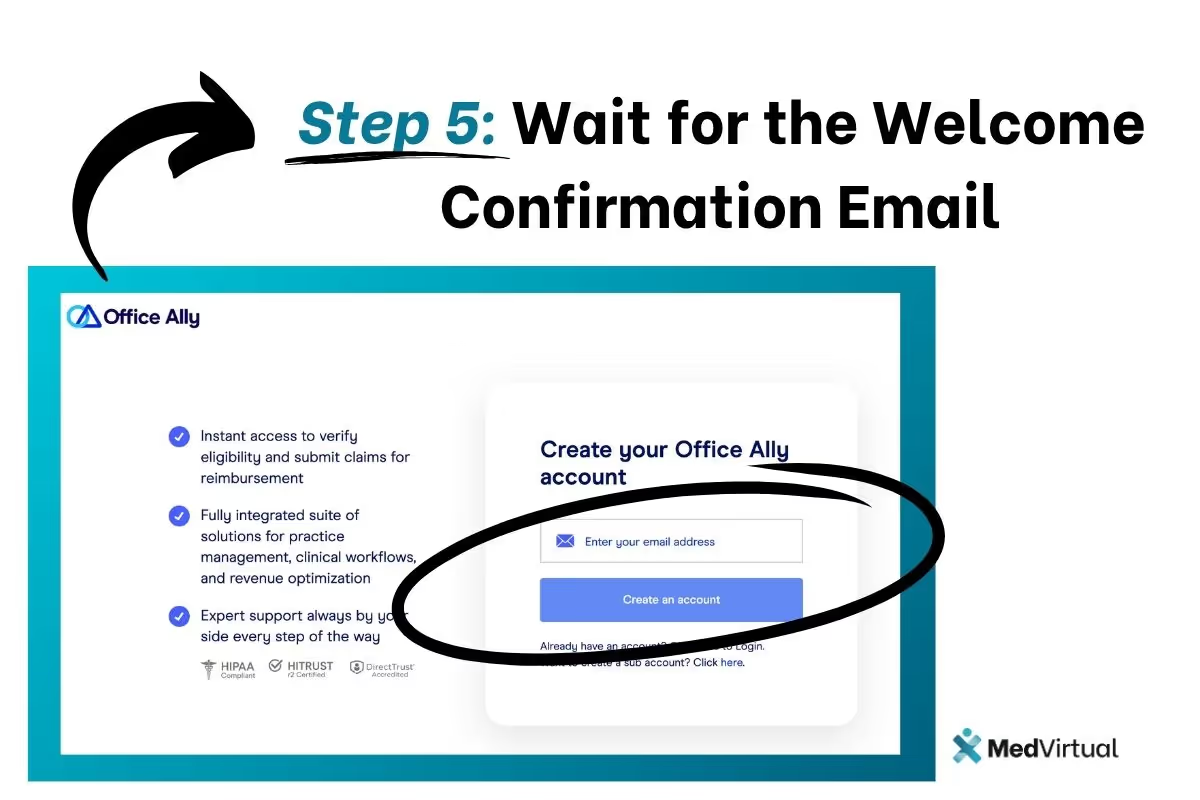
Step 5: Wait for the Welcome Confirmation Email
After submitting your email, a message will appear on the screen notifying you that a verification email has been sent. This email typically arrives within a few minutes.
If you don’t see the email after a short time, check your spam or junk folder. You must verify your email address to proceed to the next step.
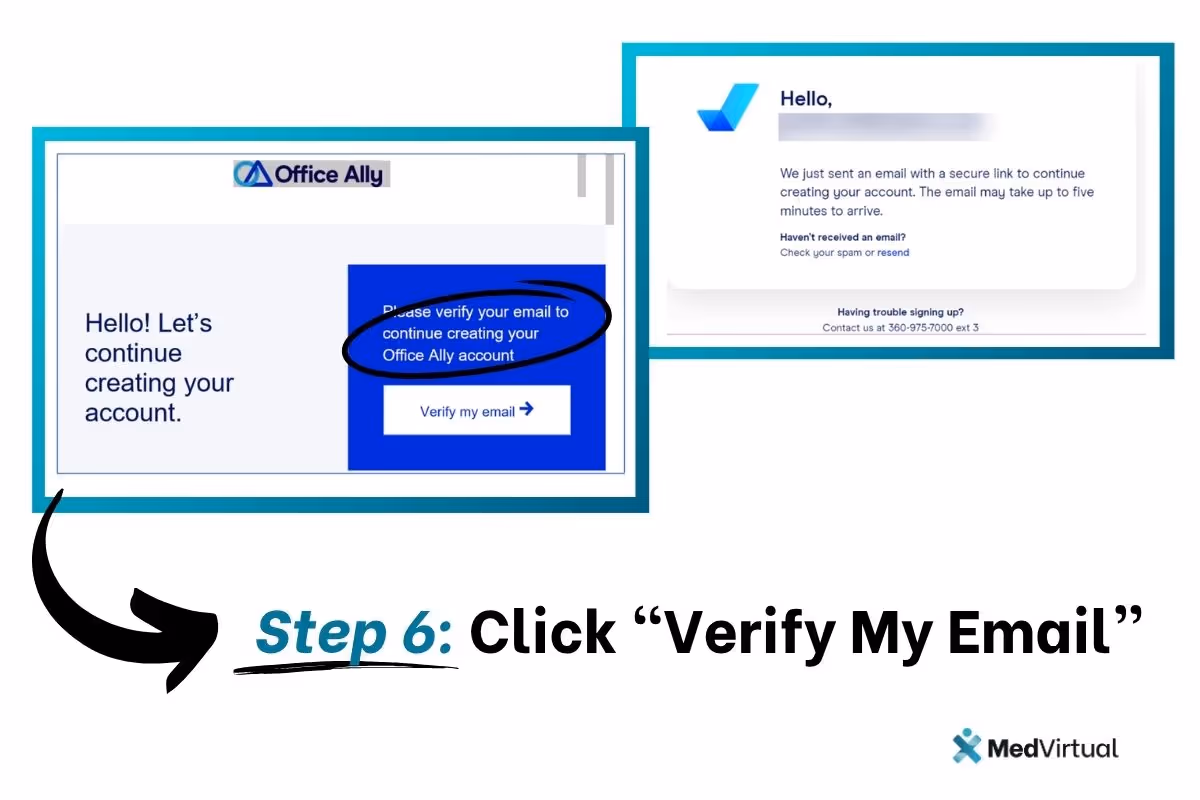
Step 6: Click “Verify My Email”
Open the confirmation email from Office Ally and click the “Verify My Email” button. This link will take you back to the registration portal, confirming that your email address is valid and linked to your account.
This step is essential to activate your registration and continue the setup process.
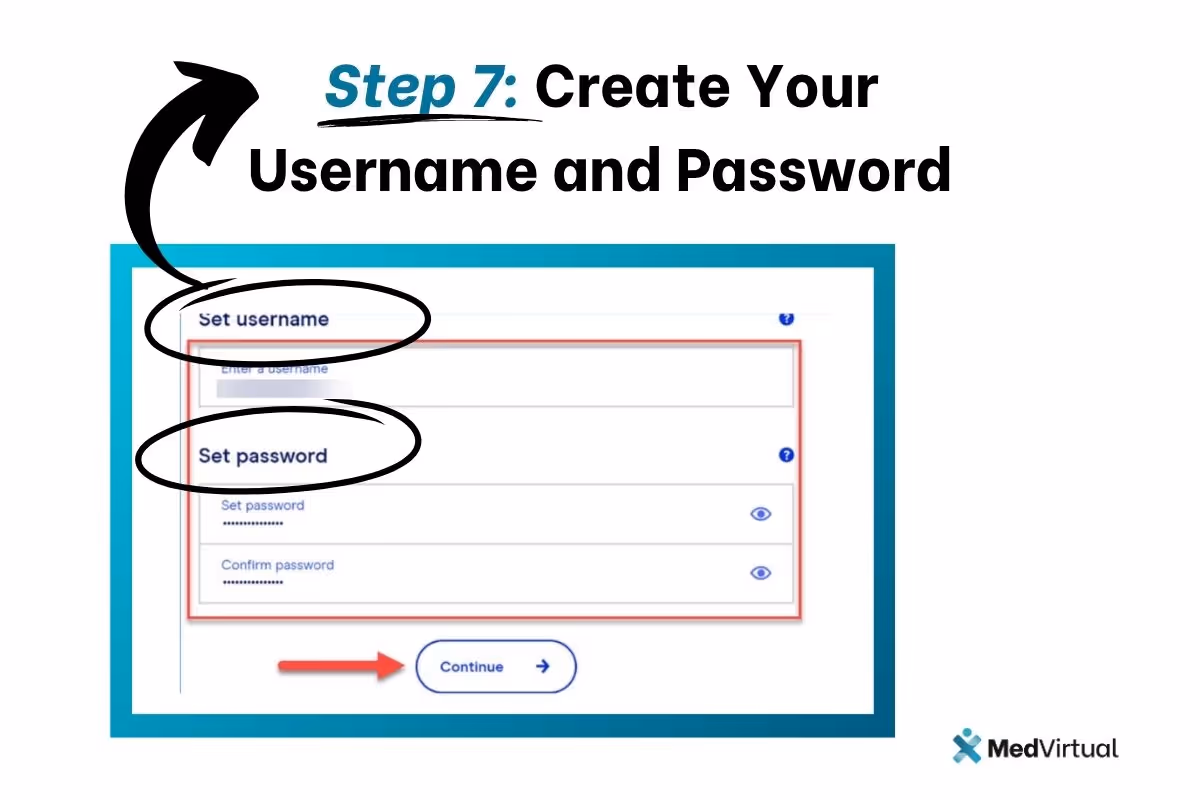
Step 7: Create Your Username and Password
Once you’ve verified your email, you’ll be prompted to set your account credentials.
- Choose a username (typically your name or organization abbreviation)
- Create a secure password and confirm it
After completing these fields, click “Continue.” Your login credentials will now be active.
Step 8: Enter Practice Contact Information
Next, you’ll be asked to fill in your organization’s basic information. This includes:
- Practice name
- Phone number
- Mailing address (street, city, state, ZIP code)
These details help Office Ally create a complete provider profile for payer enrollment and system access.
Step 9: Complete the Practice Profile
Continue entering any additional required information, such as administrative contacts or alternate billing details. This step ensures that Office Ally can configure your account accurately and verify your practice type.
The platform may request optional identifiers like your Tax ID or National Provider Identifier (NPI), though these can often be added later.
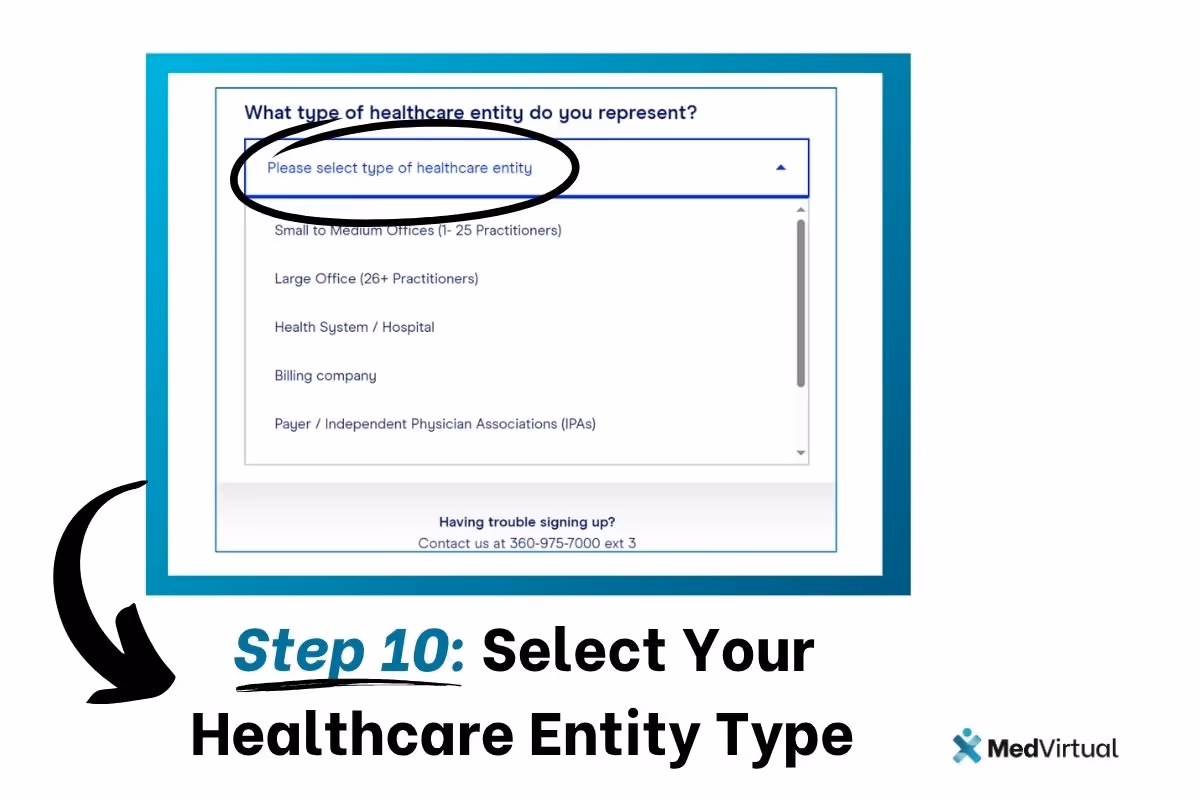
Step 10: Select Your Healthcare Entity Type
You’ll be prompted to choose the category that best describes your organization. Options typically include:
- Small to Medium Office (1–25 providers)
- Large Group or Enterprise (26+ providers)
- Hospital or Health System
- Billing Company
- Independent Physician Association (IPA)
Select the appropriate entity type, as this classification will help Office Ally tailor your dashboard and payer setup experience.
Step 11: Registration Complete
After selecting your entity type and reviewing your information, click “Submit” or “Finish.” You’ll receive confirmation that your account has been created.
From here, you can immediately:
- Access the Office Ally dashboard
- Start the payer enrollment process
- Explore tools like Claim Copilot, Practice Mate, and EHR 24/7
Your registration is now complete. You’re ready to manage claims, verify eligibility, and streamline your daily operations with Office Ally.
What Happens After Registration
Once your Office Ally account is set up, you’ll have immediate access to the provider dashboard and can begin configuring the tools your practice needs. Here’s what to expect next, and what steps you should take to ensure a smooth transition into the platform.
1. Log In to Your Dashboard
Use the username and password you created during registration to log in at https://cms.officeally.com. The dashboard is your control center—this is where you'll manage claims, access Practice Mate, view EHR tools, and more.
2. Complete Payer Enrollment
To start submitting claims, you’ll need to complete payer enrollment forms for the insurance companies you bill. Office Ally provides a payer enrollment tool within your dashboard to help you:
- Search for payers by name or payer ID
- Download and complete required enrollment documents
- Track enrollment status and updates
Enrollment processing times vary by payer but can take anywhere from a few days to several weeks, depending on the insurance company.
3. Set Up Your Practice Workflow
After your payers are connected, configure your internal workflows. You can:
- Add patient profiles and insurance details
- Set up staff accounts with role-based permissions
- Customize templates in Practice Mate and EHR 24/7 for documentation, scheduling, and billing
Office Ally's tools are modular, so you can activate only the features you need and expand over time.
4. Begin Testing Claims and Verifications
Before going live, Office Ally allows you to submit test claims to ensure your setup is functioning properly. It’s highly recommended that you:
- Verify patient insurance eligibility using Claim Copilot
- Submit a small batch of test claims
- Confirm that remittance reports are delivered correctly
This helps catch any issues early and ensures that your billing cycle is set up accurately.
5. Get Support and Training (If Needed)
Office Ally offers free training webinars, onboarding documents, and live support via phone. If you’re unfamiliar with the platform or want to train your billing staff, take advantage of these resources to ensure proper implementation.
Need Help? Office Ally Support Resources
Even with a streamlined process, questions can come up, especially during your first few weeks on the platform. Whether you're troubleshooting a claim issue, trying to connect with a payer, or simply need help navigating your dashboard, Office Ally offers a range of support options designed to keep your practice running smoothly.
In addition, MedVirtual is a valuable partner that provides expert guidance and virtual assistance to healthcare providers using Office Ally. MedVirtual’s knowledgeable team can help with tasks such as insurance verification, claim submissions, and navigating Office Ally’s comprehensive suite of tools, ensuring your practice maximizes the platform’s benefits efficiently and effectively.

Frequently Asked Questions (FAQ)
What is Office Ally?
Office Ally is a healthcare technology platform that provides a comprehensive suite of solutions including electronic health records (EHR), practice management, clearinghouse services, and revenue cycle management tools designed to streamline workflow for healthcare providers.
How do I register with Office Ally in 2025?
You can register by visiting the official Office Ally website, selecting your service path, and following the step-by-step registration guide provided in this article. The process involves creating an account, verifying your email, entering practice details, and completing your profile.
Is Office Ally suitable for small practices?
Yes, Office Ally offers user-friendly and cost-effective solutions that cater to solo practitioners, small to medium-sized practices, and larger healthcare organizations alike.
What are the key benefits of using Office Ally?
Benefits include streamlined claims management, real-time insurance verification, reduced claim denials, access to a comprehensive suite of tools like Practice Mate and EHR 24/7, and HIPAA-compliant data security to enhance patient care and financial performance.
Does Office Ally support HIPAA compliance?
Yes, Office Ally is fully HIPAA compliant, ensuring that all patient data and communications are secure and meet regulatory standards.
Can I manage billing and claims through Office Ally?
Absolutely. Office Ally’s clearinghouse and revenue cycle management tools simplify claims submission, track payments, and help reduce claim rejections to improve your practice’s cash flow.
What support resources does Office Ally offer?
Office Ally provides free training webinars, onboarding documentation, and live customer support to assist healthcare providers and their teams in maximizing the platform’s benefits.
How soon can I start submitting claims after registration?
Once your registration and payer enrollment are complete, and your practice workflow is configured, you can begin submitting claims. It is recommended to perform test claims first to ensure everything is set up correctly.
Can I access lab results and medical records through Office Ally?
Yes, Office Ally’s EHR system allows healthcare professionals to securely access and manage lab results, medical records, and patient information in one place.
Is Office Ally’s Practice Mate included with registration?
Yes, Practice Mate is a free practice management tool included with Office Ally that helps manage scheduling, billing, and patient demographics efficiently.